
Events (under the Manage tab) allow for administrators to create, edit and review all events by your organization. To begin creating an Event, navigate to the Events functionality under Manage and click on "New Event."
Event Information
Upon creating a new event, complete the following information to set up your event in Community Spark.
- Title - Note that the selected Title will appear on the calendar and in event promotions.
- Description - Share information on what will be happening at the event.
- Primary Contact - Select an individual to be the primary contact for the event (optional).
- Start and end dates and times.
- Area - Select the area the event will be happening (refer to the Areas help article in the admin section for more detail on Areas)
- Organization - Select the appropriate organization. If the organization does not exist in your Community Spark database, you may create one here.
- Notate if the event is being hosted online and/or in person.
- Header Photo- Upload an image for the event to be displayed with your event posting. You are able to upload a Header Photo for promotion. These photos appear as landscape photos and are automatically cropped. The optimal size is 600 X 336.
- Notate if the event is urgent - If an event is marked as "Urgent", the design will display urgent next to these events to indicate that it is an event to take action on quickly.
- Notate if the event services low and moderate-income individuals or if the volunteer's financial knowledge will be utilized.

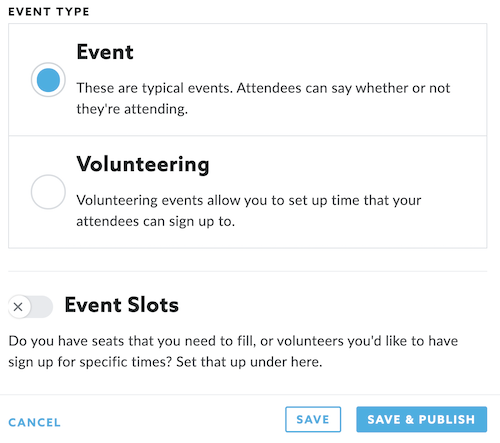
Event Type and Registration Slots
Community Spark allows you to create two types of events, events that you are inviting your organization to and events in which you are providing employees with the opportunity to volunteer.
- Event Type - This allows you to notate if this is a standard event or an event in which employees may volunteer.
- Event Slots - This allows you to notate if you would like to allow for registration with specific times for volunteers to register for an event or for attendees to participate in an event. If you turn the Event Slots On, then you are able to select different times for registration between your start and end time. For Instance, If you select 15-minute time slots with a time starting at 11 AM and finishing at 12 PM, you will have 4-time slots created for employees to register for.
We advise selecting "Volunteering" when you are indicating an opportunity that would allow them to earn credit for volunteering.
Time slots may additionally be utilized for non-volunteering events if you would like employees to register to specific time slots to attend.
Registering Attendees for an Event
Administrators with event permissions may add users to an event so that the users will not have to register themselves. To register someone for an event:
- Click on View next to the event in Manage.
- On the event details screen, Click on Add Someone to the right of Attendees on the right-hand side of the screen. This will allow you to register someone else.
- If you click Join, it will prompt you to register yourself for an event. If events are enabled, all users have access to the Join an event feature.
- Enroll for weekly new event digest emails so you don't miss an opportunity to volunteer. This feature is turned off by default, you can enable it through your account settings.
Duplicating an Event
In the instance of a recurring event, you can duplicate an event by navigating to the Events screen under Manage. To duplicate an event:
- Click on View next to the event in Manage.
- On the event details screen, click on Duplicate to the right.
- Follow the instructions above for filling out the event details.
Canceling an Event
In the instance an event needs to be canceled, it may be canceled by navigating to the Events screen under Manage. To cancel an event:
- Click on View next to the event in Manage.
- On the event details screen, click on Cancel to the right.
- All registrants will receive a notification that the event has been canceled.
Deleting an Event
Events can be deleted from the Manage --> Events section. Deleting an event will remove it entirely from your Events Section. To delete an event:
- Click Edit next to the event in Manage.
- Scroll to the bottom of the event, and click the Delete button in the lower-left
- A message will pop-up asking you if you're sure you want delete this event. Click the OK button to finalize its removal.
Exporting Events
A historical export of your Events logged within Community Spark is available by navigating to Manage and then Events.
To bulk export Events:
- Click on the Export icon to the right side of the screen.
- Make your selections on the Events Export modal that opens and click Submit.